Overview :
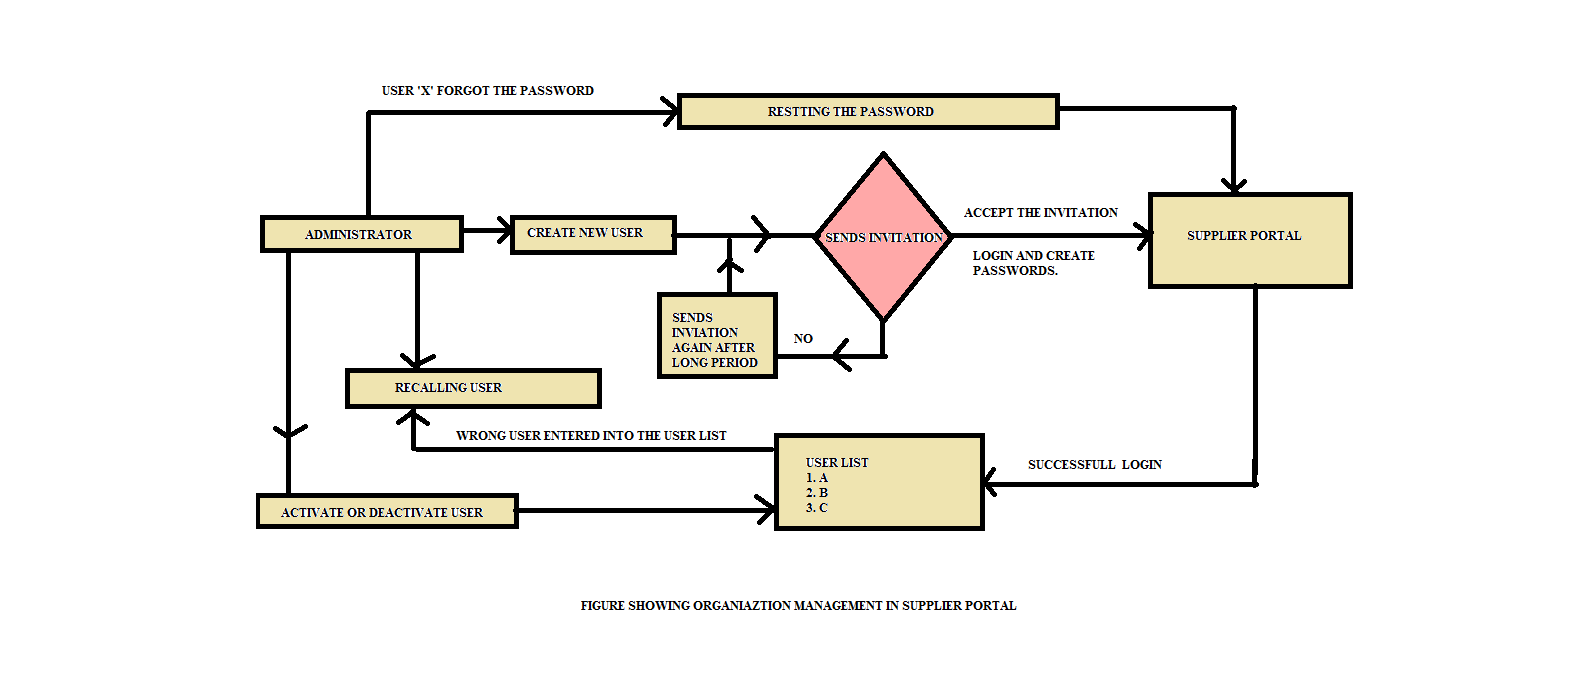
Organization or Business System is collection of all the entities involved in the Business Process. And Controlling and Arranging of all the entities , activities in such a way that it would result into a Successful and Productive Business, is the job of Administrator.
Hence, it is the Administrator that controls and arrange these concepts in a particular Organization. If we consider about the PIM Supplier Portal, it the Administrator that would be responsible for the inviting all the Suppliers, Approving their Invitation or Reject their Invitation in an Organization.
If you are the Administrator of the PIM, then you can invite the other users to access the Portal . Those users after being approved, can read and send system message, product's information can uploaded to the Portal. Administrator after approving confirms that those user have their valid Log in credentials that can be used for accessing the Portal.
Manipulating User Details :
In this Portal, as an Administrator, he/she can view all the details about the Registered Users. And the Type of data they have supplied to the Portal. Under “Supplier User Details” you can change the User Information such as name, contact email address etc. This will flag to indicate whether that supplier is Active or Inactive. In Order to Change the Details regarding Users, follow the steps given below :
- Choose the Particular user from User List.
- Navigate to “Action” → “Open Supplier User”.
- Perform Editing Work in the Fields.
- Changes regarding these will be sent to user and their Timeline of Administrator.
Creating Users :
In this portion, other user can be added, so that they can also supply the Product details and use this Portal.
In order to Create such users, follow the following steps given below :
- Navigate to Organization Management → Create User.
- Give the Name and email Address.
- Choose the default Language for the User.
- Click on Save.
- On Clicking Save, System will generate the Invitation Mail to the Supplier.
- This will show the name of newly added user in the User List and status of this can be seen as “Invited”.
Recalling an Invitation :
This is important portion for Administrator, Since if you had send incorrect mail to the person, so you will need to delete the Particular User by Recalling An Invitation. In order to delete this follow following steps:
- Choose the Particular user from User List.
- Navigate to “Action” → “Revoke Invitation”.
- This will prompt you to Confirm.
- Click on Yes.
- Now the User will be Deleted and could no longer be able to Generate Passwords.
Re-sending an Invitation :
This section can be used for Sending the Invitation Again since the User you had send the Invitation had not Log in after a Long period of Time. For This Follow the following steps:
- Choose the Particular user from User List.
- Navigate to “Action” → “Resend Invitation”.
- This will prompt you to Confirm.
- Click on Yes
- This will again send the Invitation Mail to the Particular User.
Deactivating Users :
This will allow the Administrator to deactivate those user who are in the Active State. So that the user could not be able to log in to Portal and supplied the Invalid or wrong Product Information. In Order to do follow the steps:
- Choose the Particular user from User List.
- Navigate to “Action” → “Deactivate user”
- This will prompt you to Confirm.
- Click on Yes.
- This will deactivate the User.
Activating Users :
Opposite to the Deactivating User, if You Require that User to be in active state. Then you can follow the following steps :
- Choose the Particular user from User List.
- Navigate to “Action” → “Reactivate user”
- This will prompt you to Confirm.
- Click on Yes.
- This will Reactivate the User.
Resetting Users Passwords :
If in case user forget the Password, and unable to log in into this Portal, the, Administrator can Reset the Password. And respective user will be informed via mail about the Changes in the Password.
- Choose the Particular user from User List.
- Navigate to “Action” → “Reset Password ”
- This will prompt you to Confirm.
- Click on Yes.

Thanks for Reading...
0 Comment(s)