-
Creating Chrome Extensions
almost 10 years ago
Creating Chrome Extensions
Extensions are the way to add functionalities to browser without changing anything in the native code. It is actually very easy to write an extension. It requires only a basic knowledge of:
- HTML
- CSS
- Javascript
It is just like building a small webpage. To take an example, here we will build a small extension that will just fetch the url of the of current tab and will show with a message whenever the extension icon is clicked. In chrome extension if we look at basic there will be 4 parts that we will need in our application:
1) An icon
2) A manifest.json file
3) A js file
4) A HTML fileIcon will be the button by clicking on which a popup type page will open. This image is simply a 19px-square PNG file it will be shown next to Chrome's Omnibox like given in the image below. You can use the attached image myicon.png given at last in the blog for your development.

A manifest.json file is the one that stores the configurations of the extensions like version, name and other details. To see details about the manifests you can go through the following link.
https://developer.chrome.com/extensions/manifestIn our case we have created our manifest.json like this:
{
  "manifest_version": 2,

  "name": "MyFirstExtension",
  "description": "This extension shows a message and currently open URL",
  "version": "1.0",

  "browser_action": {
    "default_icon": "myicon.png",
    "default_popup": "mypopup.html"
  },
  "permissions": [
    "activeTab"
  ]
}
Here we can see there are different types of options specified. browser_action specifies what icon needs to be shown and what popup will open when the icon gets clicked. permissions are different types. The full list of permissions can be found at chrome permissions.
A js file is the file where we will write our script in our case for our requirement we have a created a file mypopup.js like this whose work is to fetch the current tabs and url and display it in the popup.function getCurrentTabUrl(callback) { // Query filter to be passed to chrome.tabs.query - see // https://developer.chrome.com/extensions/tabs#method-query var queryInfo = { active: true, currentWindow: true }; chrome.tabs.query(queryInfo, function(tabs) { // chrome.tabs.query invokes the callback with a list of tabs that match the query. var tab = tabs[0]; // A tab is a plain object that provides information about the tab. // See https://developer.chrome.com/extensions/tabs#type-Tab var url = tab.url; // tab.url is only available if the "activeTab" permission is declared. console.assert(typeof url == 'string', 'tab.url should be a string'); callback(url); }); } document.addEventListener('DOMContentLoaded', function() { getCurrentTabUrl(function(url) { document.getElementById('response').textContent = url; }); });At last we need to create an html page that will be shown on clicking on the icon. In our case we have named it mypopup.html, it will look like this:
<!doctype html>
<html>
  <head>
    <title>My First Chrome Extension</title>
    <style>
      .para {
        font-size: 22px;
        margin-bottom: 20px;
      }
      #response {
        color: red;
        font-size: 40px;
        /*max-width: 400px;*/
      }
    </style>
    <script src="mypopup.js"></script>
  </head>
  <body>
    <div class="para">I can see you watching:</div>
    <div id="response"></div>
  </body>
</html>
Now finally place all the 4 files in a single folder.
Loading Extension in chrome:1) First go the the menu icon
 of the chrome. and then select More Tools -> Extensions. Then you will reach your extensions page.
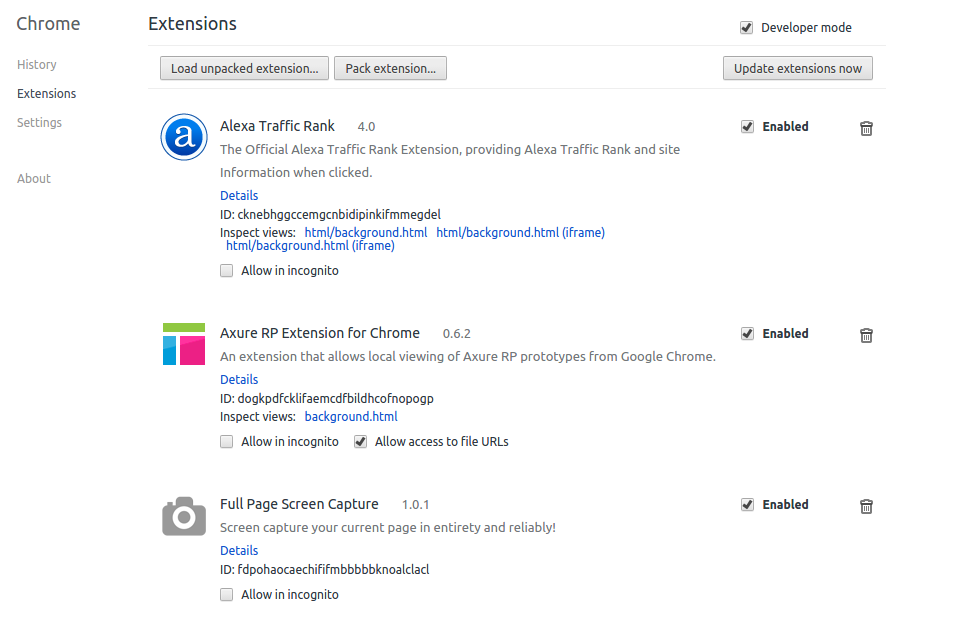
2) Check the Developer option box
3) Click on Load Unpacked Extension and browser for your extension folder, where you have kept your previously discused 4 files and upload that.
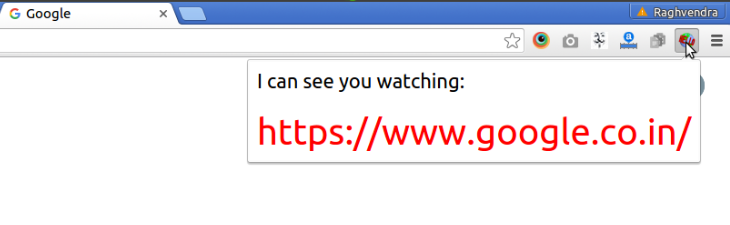
4) That's it your extension is now added in the browser. Open any url in any tab and click on the icon and you will see a popup like this:


0 Comment(s)