-
Understanding directives in AngularJS
about 10 years ago
Directives are an important feature of AngularJS which are used to extend HTML and create reusable and testable code. The framework provides a set of rich built in directives and we can also build custom ones if required. In this tutorial we will first learn the basic concepts associated with directives and then we will build custom directives of our own.
Overview :
Directives provide functionality for extending HTML. They are markers on DOM elements (such as elements, attributes etc). Using them we can create custom HTML tags or attach specific behavior to DOM elements. Following are typical scenarios where directives are used in an AngularJS applications:
1) To extend/modify the behavior of existing elements
2) Reuse of HTML snippets
3) To create new HTML structure with complete rendering & business logicSome important built in directives provided by AngularJS:
1) ng-app
This directive is used to auto-bootstrap an AngularJS application.
2) ng-init
This directive is used to initialize application data.
3) ng-model
This directive is used to bind values of input controls to application data.4) ng-repeat
This directive is used to loop through the elements in collection.5) ng-bind
This directive is used to replace the content of HTML element with a given expression.6) ng-controller
This directive is used to attach controller class to the view.7) ng-click
This directive is used to specify custom behaviour on click of an element.8) ng-class
This directive is used to dynamically set CSS classes on HTML elements.9) ng-if
This directive is used to remove or recreate a portion of DOM tree based on an expression.10) ng-show/ng-hide
This directive is used to show or hide a HTML element based on an expression.
Implementing your own custom directive:
Now that we have gone through some important built in directives , let's create a custom directive from scratch. For doing so we will be using AngularJS module’s directive function (syntax as below) :angular.module('myApp', []) .directive('directiveName', [function() { return { //returns Directive Definition Object. // Directive definition goes here. }; }]);
To create a custom directive we need to pass the directive name as the first argument to the function followed by a factory function. This factory function is used for setting up and configuring the directive and it's retrun type is Directive Definition Object. An important point to keep in mind while choosing name for directive is that AngularJS will normalize the name of a directive in HTML to match the same in JavaScript. It removes out certain prefix like [x-, data-] if they are present and then converts character [- , :, _] separated names to camelCase and then matches the name in JavaScript.
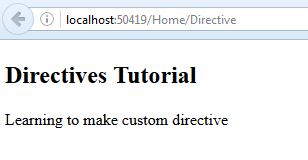
Having learned the syntax it is time now to see a custom directive in action. Below is a very simple directive definition wherein we are defining newtag and returning sample text.var directiveApp = angular.module('directiveApp', []); directiveApp.directive('newtag', function () { return { template: 'Learning to make custom directive', restrict: "E" }; });Let us save the above code snippet in a separate js file ( directive.js ) and call it in html file as shown below:
<html ng-app="directiveApp">
<head>
    <title>AngularJS Directives</title>

</head>
<body ng-controller="testController">

    <h2>Directives Tutorial</h2>

    <newtag></newtag>

     <script src="//cdnjs.cloudflare.com/ajax/libs/angular.js/1.2.20/angular.min.js"></script>
     <script src="~/scripts/directive.js"></script>
</body>
</html>
On running the above piece of code we get the below result in browser , as can be clearly seen the "newtag" element is replaced by text provided in template section of directive definition. We have also used a keyword "restrict" which will be explained later .
In the above example we have created a new HTML element. An AngularJS directive can be used in following four ways :
1) A new HTML element (<custom -directive></custom>).
2) An attribute on an element (<div custom-directive></div>).
3) As a class (<div class="custom-directive: expression;"></div>).
4) As comment (<!-- directive: custom-directive expression -->).
To choose the way our directive is used out of the above options we use the restrict key of Directive Definition Object as per below syntax..directive('widget', [function() { return{ templateUrl:'item.html', restrict:'E' } }]);The possible values for restrict are:
1) A : To be used as an attribute (default behavior).
2) E : To be used as an Element.
3) C : To be used as class name in existing HTML elements.
4) M : TO be used as HTML comments.Conclusion:
In this article we have covered some important aspects of directives and there usage. These are powerful constructs that can be used simply by specifying them as element/attribute/class in our html. For more detailed information do check out the official documentation at https://docs.angularjs.org/guide/directive


0 Comment(s)