-
@Input/@Output for Component Property & Custom Event Binding in Angular4
over 8 years ago
In Angular, one-way communication from parent to child component can be done via "@Input" decorator. A component property will act as input property if it is annotated with @Input decorator. This component property within one component(child component) will receive a value from another component(parent component). The @Input decorator can be annotated to any property type such as number, string, array or user-defined class etc. @Input(alias) decorator is used for the alias of the binding property name.

Example :
@Input()
Message : string;    //@Input with string data type
@Input('stuArray') studentArray : Array<string> // @Input with Array data type and aliasing the property name.@Input() stu : Student; // @Input with User defined data type (Student)
Component Property Binding using @InputExample :
A user defined class "student" is createdexport class student { fname: string; lname: string; constructor() { } }There are two components "app.component.ts" (parent component) and "student.component.ts" (child component). Component property binding is performed by creating a custom element in parent component which is a selector in child component.
Parent Component "app.component.ts"
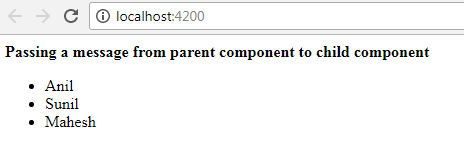
import { Component } from '@angular/core';
import {student} from './model/student';

@Component({
  selector: 'app-root',
  template: `<app-student [stuArray]="studentArray"	[studentMsg]="stdMsg"></app-student>`
})

export class AppComponent {
  //Property for child component
	studentArray = ['Anil', 'Sunil', 'Mahesh'];
	stdMsg = 'Add Student';
}
Child Component "student.component.ts"import { Component, OnInit,Input } from '@angular/core'; import { student } from '../model/student' @Component({ selector: 'app-student', templateUrl: './student.component.html', }) export class StudentComponent implements OnInit { @Input() studentMsg : string; @Input("stuArray") studentArray : Array<string> constructor() { } ngOnInit() { } }
Displaying binded property in student component template "student.component.html"<b> {{studentMsg}}</b> <ul> <li *ngFor = "let student of studentArray"> {{student}} </li> </ul>
"index.html" which is actually rendered<!doctype html> <html lang="en"> <head> <meta charset="utf-8"> <title>AngularDemo</title> <base href="/"> <meta name="viewport" content="width=device-width, initial-scale=1"> <link rel="icon" type="image/x-icon" href="favicon.ico"> </head> <body> <app-root></app-root> </body> </html>Output :
@Output
In Angular, one-way communication from child to parent component can be done via "@Output" decorator. Data is sent from called (child) component to calling (parent) component. The angular EventEmitter class is the type to which @Output decorator binds a property. This property name then acts as custom event name for calling component. In short, EventEmitter is used for emitting an event to the parent which will then capture an exposed event and retrieve data. @Output(alias) decorator is used for the alias of property name which then can be used in calling component for custom event handling.
Example :
@Output()
sendStdMsgEvent = new EventEmitter<string>();   //sendStdMsgEvent is custom event name with EventEmitter having string data type
@Output('addStudentEvent') addStdEvent = new EventEmitter<Student>(); // addStudentEvent is custom event name which will be used in calling component with EventEmitter having user defined data type (student)
Custom Event Binding using @Output and EventEmitterBelow example shows a combination of @Input and @Output decorator. The child component receives initial data via the @Input decorator from the parent component. In turn, child component sends back the updated data to the parent via @Output decorator and Event emitter.
Parent Component "app.component.ts"
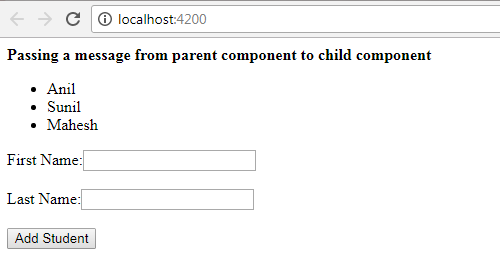
import { Component } from '@angular/core';
import {student} from './model/student';
import {expert} from './model/expert';

@Component({
  selector: 'app-root',
  template: `<app-student [stuArray]="studentArray"	[studentMsg]="stdMsg" (addStudentEvent) = "saveStudentData($event)"></app-student><h1>{{stdfullname}}</h1>
             `
})
export class AppComponent {
  //Property for child component one
	studentArray = ['Anil', 'Sunil', 'Mahesh'];
  stdMsg = 'Passing a message from parent component to child component';
  stdfullname = '';

  saveStudentData(std){
    this.stdfullname = std.fname + " " + std.lname
    this.studentArray.push(std.fname);
  }
}
Child Component "student.component.ts"import { Component, OnInit, Output, Input,EventEmitter } from '@angular/core'; import { student } from '../model/student' @Component({ selector: 'app-student', templateUrl: './student.component.html', }) export class StudentComponent implements OnInit { @Input() studentMsg : string; @Input("stuArray") studentArray : Array<string> @Output('addStudentEvent') addStdEvent = new EventEmitter<student>(); std = new student(); addStudent() { this.addStdEvent.emit(this.std); } constructor() { } ngOnInit() { } }
"student.component.html" is altered as<b> {{studentMsg}}</b> <ul> <li *ngFor = "let student of studentArray"> {{student}} </li> </ul> <div> First Name:<input (input)="std.fname=$event.target.value" /> <br/><br/> Last Name:<input (input)="std.lname=$event.target.value" /> <br/><br/> <button (click)="addStudent()">Add Student</button> </div>Output :
Adding a student firstname to array
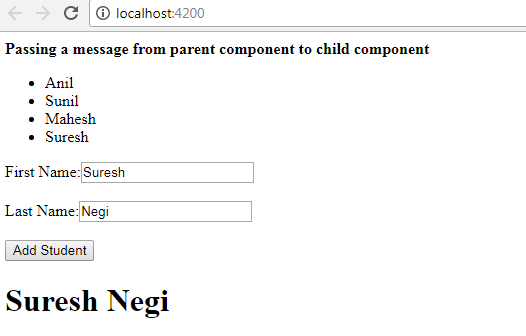
In parent component, EventEmitter's event is added to child component selector(app-student). Since EventEmitter's event (addStdEvent) in child component was aliased with the name "addStudentEvent", it will be used in child component selector in calling component. addStudentEvent is given a method saveStudentData with $event parameter which will receive content sent from child component that emitted the event.


0 Comment(s)