-
How to upload multiple files in asp.net mvc?
over 9 years ago
Instead of uploading files one by one, it is better to use multiple files upload in your application so that it can save user time and effort. In mvc, there is noneed to write javascript or jquery to ulpoad multiple files. There is a HttpPpostedFileBase class in MVC, So it is very easy in mvc to upload multiple files and pass it to the controller.
Let's start to implement the same step by step.Step 1: In your application,right click on model folder in solution explorer. Then create a model MultipleFileModel.cs. In this Model we add a property to upload multiple file.
using System;
using System.ComponentModel.DataAnnotations;

namespace MvcWebApplication.Models
{
    public class MultipleFileModel
    {

        [Required(ErrorMessage = "Please select file.")]
        [Display(Name = "Browse File")]
        public HttpPostedFileBase[] files { get; set; }
    }
}
Step 2: Now add a controller by right click on controller folder in solution explorer. FileController is added in the application. Now We will add actionresult to render view. FileController is given below:
using System.IO;
using System.Web;
using System.Web.Mvc;

namespace MvcWebApplication.Controllers
{
    public class FileController : Controller
    {

        //GET:File
        public ActionResult UploadMultipleFiles()
        {
            return View();
        }

        [HttpPost]
        public ActionResult UploadMultipleFiles(HttpPostedFileBase[] files)
        {

            if (ModelState.IsValid)
            {
                foreach (HttpPostedFileBase file in files)
                {

                    if (file != null)
                    {
                        var FileName = Path.GetFileName(file.FileName);
                        var ServerSaveFilePath = Path.Combine(Server.MapPath("~/UploadedMultipleFiles/") + FileName);
                        //Save file to server folder
                        file.SaveAs(ServerSaveFilePath);

                        ViewBag.UploadMessage = files.Count().ToString() + " files uploaded successfully.";
                    }

                }
            }
            return View();

        }

    }
}
Step 3: Now create a view which should be strongly typed view. So Here UploadMultipleFiles view is strongly typed for MultipleFileModel model. UploadMultipleFiles.cshtml is given below:
@model MvcWebApplication.Models.MultipleFileModel

@{
    ViewBag.Title = "UploadMultipleFiles";
}

<h2>UploadMultipleFiles</h2>


@using (Html.BeginForm("UploadMultipleFiles", "File", FormMethod.Post, new { enctype = "multipart/form-data" }))
{
    @Html.AntiForgeryToken()

    <div class="form-horizontal">
        <hr />
        @Html.ValidationSummary(true, "", new { @class = "text-danger" })
        <div class="form-group">
            @Html.LabelFor(model => model.files, htmlAttributes: new { @class = "control-label col-md-2" })
            <div class="col-md-10">
                @Html.TextBoxFor(model => model.files, "", new { @type = "file", @multiple = "multiple" })
                @Html.ValidationMessageFor(model => model.files, "", new { @class = "text-danger" })
            </div>
        </div>
        <div class="form-group">
            <div class="col-md-offset-2 col-md-10">
                <input type="submit" value="Upload Files" class="btn btn-success" />
            </div>
        </div>
        <div class="form-group">
            <div class="col-md-offset-2 col-md-10 text-success">
                @ViewBag.UploadMessage
            </div>
        </div>

    </div>
}
Step 4: Create a folder named UploadedMultipleFiles or as you want to save your files in that particular folder.

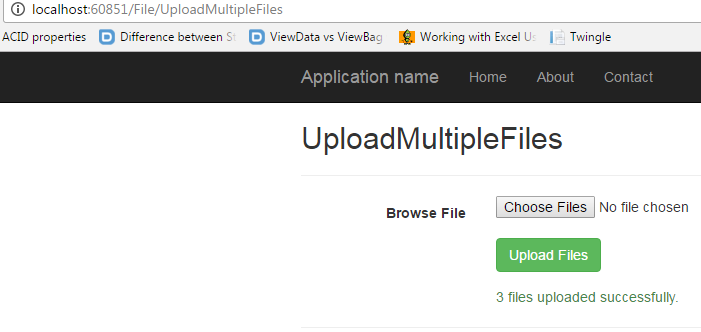
Step5: A) Now Debug your application. click on Browse button and select multiple files you want to upload.

B) Now click on upload button.It will display a file status when the files will be uploaded.
C) Ensure that files are uploaded successfully to the Server folder which is used to save the uploaded files.
After browsing the Server folder, the uploaded files will be located as follows: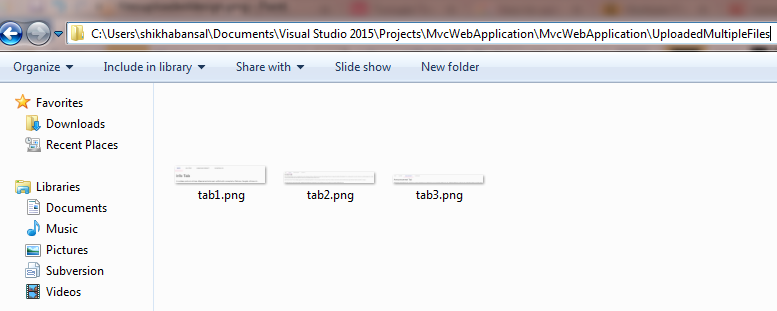


0 Comment(s)