-
Consuming Web API in a Windows Phone 8.1 application
over 9 years ago
Open Visual Studio and select Windows Phone from Visual C# templates. From the available project types, select "Blank App(Windows Phone)" and click OK. To consume a Web API in windows phone application, first we need a working API. Thanks to JSONPlaceholder for providing fake online REST API for testing and prototyping.
For this article, we will be playing with following API provided by JSONPlaceholder which returns 100 dummy album records.
https://jsonplaceholder.typicode.com/albums
If you run this API in your browser, you'll see album list in JSON format as shown in the following example.
[
  {
    "userId": 1,
    "id": 1,
    "title": "quidem molestiae enim"
  },
  {
    "userId": 1,
    "id": 2,
    "title": "sunt qui excepturi placeat culpa"
  }
  .....
  .....
  .....
]
You can see that every album has three attributes userId, id and title. So let's start with album class which will hold the data for each album from the JSON output.
Creating a Model
Create a new folder Model in the project and add a new class file Album.cs inside it.
Album.cs
public class Album
{
    public int userId { get; set; }
    public int id { get; set; }
    public string title { get; set; }
}
Creating a ViewModel
Create a new folder ViewModel in the application and add a new class file AlbumViewModel.cs inside it. Before we start adding the following code in the file, it would be better idea to install required Nuget packages in the application. Right click on your project in Solution Explorer and select "Manage Nuget Packages" from the context menu.
To search for Microsoft.Net.Http type "http" in the search box, select it from the list and click on Install button. To install Newtonsoft.Json, type "json" then select it from the list and click install. Now we have installed the required packages, let's start adding the following code for AlbumViewModel.cs file.
Following namespaces are required to be added at the top of the file.
using Newtonsoft.Json;
using System.Net.Http;
using WPhone_API.Model;
using System.ComponentModel;
using System.Threading.Tasks;
using System.Collections.Generic;
Note: WPhone_API is the name of the project.
AlbumViewModel.cs
public class AlbumViewModel : INotifyPropertyChanged
{
    // Api address
    private const string baseUrl = "https://jsonplaceholder.typicode.com/albums";

    // Constructor
    public AlbumViewModel()
    {
        DownloadAlbumAsync();
    }

    // Method to initialize AlbumList from the album records fetched from Web API
    private async void DownloadAlbumAsync()
    {
        AlbumList = await GetAlbumsAsync();
    }

    // Method to retrieve list of Albums from Web API
    public async Task<List<Album>> GetAlbumsAsync()
    {
        var httpClient = new HttpClient();
        var albumListAsString = await httpClient.GetStringAsync(baseUrl);
        albumList = await Task.Factory.StartNew(() => JsonConvert.DeserializeObject<List<Album>>(albumListAsString));

        return albumList;
    }

    // Property to hold list of Albums
    private List<Album> albumList;
    public List<Album> AlbumList
    {
        get { return albumList; }
        set
        {
            albumList = value;
            RaisePropertyChanged("AlbumList");
        }
    }

    public event PropertyChangedEventHandler PropertyChanged;
    protected void RaisePropertyChanged(string propertyName)
    {
        PropertyChangedEventHandler handler = PropertyChanged;
        if (handler != null)
        {
            handler(this, new PropertyChangedEventArgs(propertyName));
        }
    }
}
Here GetAlbumsAsync() method gets the album records and then initialize the variable AlbumList with the API data. If somehow you are planning to create an application which mostly have to access Web API, in that case you would like to consider an option of putting all Web API related tasks in separate folder/layer, let's say DataService. In that case your ViewModel files will have reference of objects in DataService layer which allows you to execute the corresponding functionalities.
Creating a View
Now open the MainPage.xaml file in design mode and replace it with following XAML.
MainPage.xaml
<Page
    x:Class="WPhone_API.MainPage"
    xmlns="http://schemas.microsoft.com/winfx/2006/xaml/presentation"
    xmlns:x="http://schemas.microsoft.com/winfx/2006/xaml"
    xmlns:local="using:WPhone_API"
    xmlns:d="http://schemas.microsoft.com/expression/blend/2008"
    xmlns:mc="http://schemas.openxmlformats.org/markup-compatibility/2006"
    mc:Ignorable="d"
    xmlns:vm="using:WPhone_API.ViewModel"
    Background="{ThemeResource ApplicationPageBackgroundThemeBrush}">
    <Page.DataContext>
        <vm:AlbumViewModel/>
    </Page.DataContext>
    <Grid>
        <ListBox ItemsSource="{Binding AlbumList}">
            <ListBox.ItemTemplate>
                <DataTemplate>
                    <Grid Background="#17C436" Width="460" Height="80">
                        <StackPanel Orientation="Horizontal">
                            <TextBlock Text="{Binding userId}" Foreground="White" FontSize="20" Margin="10 30 5 0"/>
                            <TextBlock Text="{Binding id}" Foreground="White" FontSize="20" Margin="10 30 5 0"/>
                            <TextBlock Text="{Binding title}" TextWrapping="Wrap" Foreground="White" FontSize="20" Margin="10 30 5 0"/>
                        </StackPanel>
                    </Grid>
                </DataTemplate>
            </ListBox.ItemTemplate>
        </ListBox>
    </Grid>
</Page>
Note: Please change the text WPhone_API from above XAML with the name of your project.
Few explanations from the above XAML are as follows:
- As shown in the following line, we are adding a namespace of ViewModel which will be further used to refer the class to be defined as the DataContext of this page.
xmlns:vm="using:WPhone_API.ViewModel" -
In the following syntax, we have defined the DataContext of the page to AlbumViewModel class. Here vm is an alias to namespace declared in above step.
<Page.DataContext> <vm:AlbumViewModel/> </Page.DataContext> -
In the following syntax, we have set the DataContext of our page as the AlbumViewModel, so now we are able to access properties defined inside that class and can also bind our controls with them. In this syntax, we are initializing the ItemsSource of ListBox with the AlbumList which is nothing but a list of albums (List<Album>).
<ListBox ItemsSource="{Binding AlbumList}"> -
In the TextBlock controls like the one shown below, we are Binding the Text properties with the properties of Album. In other words, just think it in a way that ListBox is going to iterate over the AlbumList and while iterating over every Album we are accessing properties of current Album and binding it with the Text properties.
<TextBlock Text="{Binding userId}" Foreground="White" FontSize="20" Margin="10 30 5 0"/>
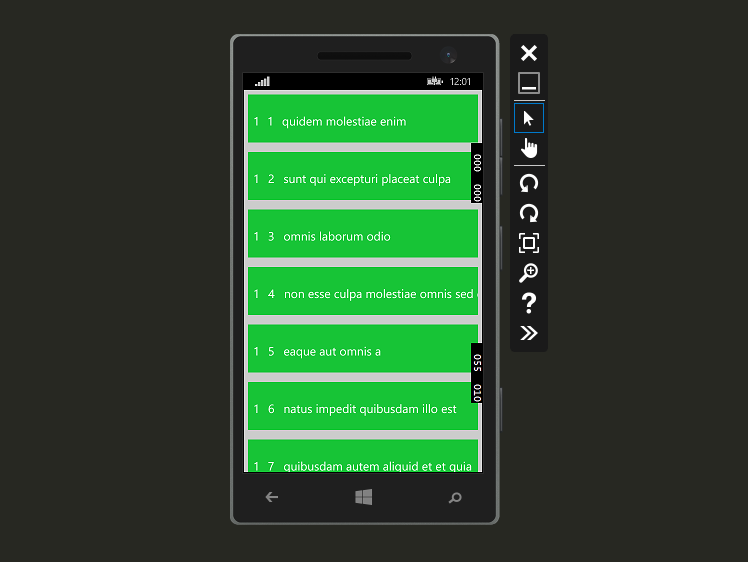
So friends we are done with our simple Windows Phone 8.1 application which shows how to consume a Web API within the application. The final output is shown in the following image.
Hope you have enjoyed this article.
- As shown in the following line, we are adding a namespace of ViewModel which will be further used to refer the class to be defined as the DataContext of this page.


0 Comment(s)