-
ASP-Net-MVC-The CRUD-Part -1 Insert and Show
about 11 years ago
Hi Friends,
I am back with my MVC article with some new things.So we've covered the concept and structure of an MVC application in my previous article which are listed below:-
1-ASP-Net-MVC-What-s-inside-Part1
2-ASP-Net-MVC-What-s-inside-Part2
We know the concepts and structure and I think we're ready to create a Hello World kind of application. The kind of word is used because this Hello World application will not be like a simple Hello World shown on a page. We'll see this in context of our daily task. Yes,you are right,a CRUD operation.
Because any application which is connected to a database,performs the CRUD in one way or other. So I'll start with simple CRUD and then we'll move to registration and authentication . MVC is a very large framework so I won't say that by these two examples you'll be expert in MVC but yes,you'll gain a confidence for sure:-)
Create a new MVC(not empty) application. With MVC application you get a lot of supporting files for reference. And let's take our traditional approach for creating the application. We create our database first with following column names.Data types and specifications are given.[Id] [int] IDENTITY(1,1) NOT NULL, [mobile] [nvarchar](50) NOT NULL, [password] [nvarchar](50) NOT NULL, [lat] [nvarchar](max) NULL, [long] [nvarchar](max) NULL, [f_name] [nvarchar](max) NULL, [l_name] [nvarchar](max) NULL, [u_name] [nvarchar](max) NULL, [Address] [nvarchar](max) NULL, [city] [nvarchar](max) NULL, [state] [nvarchar](max) NULL, [country] [nvarchar](max) NULL, [zip] [nvarchar](50) NULL, [activated] [bit] NULL, [act_code] [nvarchar](max) NULL
This is a table which is used for registration.For now ,we'll take registration as a simple CRUD operation only in which
1-the user details will be submitted
2-userlist will be shown.
1-insertUser:-Create PROCEDURE [dbo].[insertUser] ( @mobile nvarchar(MAX), @password nvarchar(MAX), @lat nvarchar(MAX) NULL, @longit nvarchar(MAX) NULL, @fname nvarchar(MAX) NULL, @lname nvarchar(MAX) NULL, @uname nvarchar(MAX) NULL, @address nvarchar(MAX) NULL, @city nvarchar(MAX) NULL, @state nvarchar(MAX) NULL, @country nvarchar(MAX) NULL, @zip nvarchar(MAX) NULL ) AS begin insert into [dbo].[user](mobile,[password],[lat],[long],[f_name],[l_name],[u_name],[Address],[city],[state],[country],[zip]) values(@mobile,@password,@lat,@longit,@fname,@lname,@uname,@address,@city,@state,@country,@zip) end2-showUsers:-
Create PROCEDURE [dbo].[showUsers]
AS
begin
    select * from [dbo].[user]
    end
Now that we've finished our database creation. Let's move to our new application in VS2013(I am using 2013 version of VS).
In many examples I've gone through,I could not find any example which connects the MVC to stored procedures. Now the question is,What is the need of it?
Yes. There is the need. Remember my first article? I told there that if you are coming from webforms and blah..blah. So that blah blah is also true for this DB Connectivity.How?
If you are coming from web forms I am sure you know about stored procedures and you are well versed with them. Stored Preocedures are way faster than any of the ORM(Object Relational Mappers-Entity Framework,NHibernate etc) known to you.
If you search over this topic,you'll get thousands of discussions going over this and stored procedures win in large project scenarios. I am not against ORMs but I find my self more comfortable with stored procedures. But we'll see the same article with Entity Framework in subsequent articles.So we'll create repositories folder in solution explorer in which we create a sub folder named Base Repository. In this folder we'll put our class files which are responsible for basic CRUD operations.
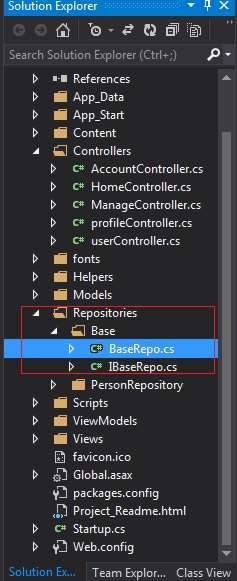
Fig 1-Repositories folder You can see two files inside Repositories->Base folder.
1-BaseRepo.cs
2-IBaseRepo.csIbaseRepo.cs is nothing but an interface of which methods are implemented in BaseRepo.cs. If you know the concept of interfaces,it's very good otherwise we'll not care about them for now. We'll focus on our goal i.e. CRUD.
There are basically two methods for CRUD operations:
1-cudCMD which is for insert ,update and delete operations
2-readCMD which is for reading data into SqlDatareader Object
The structure of the class is like following:-public class BaseRepo { SqlConnection con = new SqlConnection(); SqlCommand cmd = new SqlCommand(); string conStr = ConfigurationManager. ConnectionStrings["trackConnection"].ConnectionString; public int cudCommand(string procName, Dictionary<string, SqlParameter> procParams) { int r; if (con.State == ConnectionState.Closed) { con.ConnectionString = conStr; con.Open(); } cmd = con.CreateCommand(); cmd.CommandType = CommandType.StoredProcedure; cmd.CommandText = procName; foreach (var procparams in procParams) { cmd.Parameters.Add(procparams.Value); } r = cmd.ExecuteNonQuery(); return r; } public SqlDataReader readCmd(string procName, Dictionary<string, SqlParameter> procParams) { SqlDataReader objRet; if (con.State == ConnectionState.Closed) { con.ConnectionString = conStr; con.Open(); } cmd = con.CreateCommand(); cmd.CommandType = CommandType.StoredProcedure; cmd.CommandText = procName; foreach (var procparams in procParams) { cmd.Parameters.Add(procparams.Value); } objRet = cmd.ExecuteReader(); return objRet; } }These two methods are responsible for fetching and inserting/modifying data in database.
Now that we've setup our database and a DAL class we can move for CRUD operations. So for the task we should have a scenario.
So we're going to have a very simple scenario for out first application. We're going to insert the details about a person in which some fields are required,and some are not. We can see the inserted person details,edit or delete his details and see all users as list.
Let's enter into MVC area and create a model for the user. I have used the words person and user interchangeably as I was practicing too and could not keep that in mind. But uniformity of entity names and naming conventions of classes and their members across the application is a good practice and it must be followed.
Create a class named "user"in "Models" folder and add following properties in it.[Required] [Display(Name = "Mobile No")] public string mobile { get; set; } [Required] [Display(Name = "Password")] public string password { get; set; } [Display(Name = "Latitude")] public string lat { get; set; } [Display(Name = "Longitude")] public string longit { get; set; } [Display(Name = "First Name")] public string fname { get; set; } [Display(Name = "Last Name")] public string lname { get; set; } [Display(Name = "User Name")] public string uname { get; set; } [Display(Name = "Address")] public string address { get; set; } [Display(Name = "City")] public string city { get; set; } [Display(Name = "State")] public string state { get; set; } [Display(Name = "Country")] public string country { get; set; } [Display(Name = "Zip Code")] public string zip { get; set; }So your class file looks something like this.
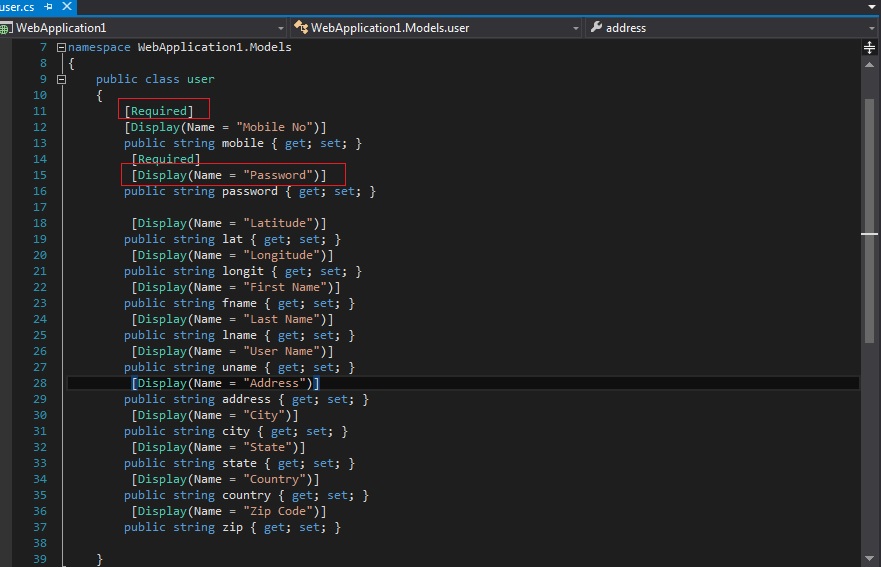
Fig 2-Model Class(user.cs) In the pic we can see two lines which are surrounded in red squares. And the syntax is like :-
1-[Required]
2-[Display(Name = "Country")]
If we look closely at the syntax, the names are pretty self explanatory and if we dig back to c# basics,we find that those are called "C# Attributes". You can always google the term and get trillions of results about the same.
The first attribute tells that the property or entity on which that attribute is applied,is required . In a simple way,we can say that it is way of validation on properties(server side).
Now what does the "Display" tells. If we put the properties name as it is,the MVC view engine generates labels for editors(if you are generating a create form) and those labels are named exactly as the property names.
So the problem is ,If you name your property-"uname",the view engine generates controls(for example label) with the same name. And at least I don't want to see my label named as "uname" instead of "User Name";
So we put display attribute and define the name to be shown so that the view engine understands that this property should be shown(shown only,otherwise no effect on entity name) as the name described in the attribute.
MVC has a fancy name for these attributes too and that is "Data Annotation".So that was about validations through data annotation(Not complete,but you can find your required annotation if you search. I required only these two ),if you want to see the implementation,keep following the article:-)
Now that we've designed our model,we need to create a controller for operations,so that we can perform operations. Now right click on controller folder and from the menu click Add->;Controller.
You get a window like following:-
Fig 3-Controller Options Window Just click the highlighted part and click add. The highlighted part means that you are creating a controller with default CRUD method bodies defined. Obviously there are other options but we'll stick to the highlighted option for the sake of simplicity and ease in creation.
After clicking the "Add" button you get a prompt for assigning a name of the controller and get a default name as "DefaultController". Change the "Default" to "user" and don't remove the word "controller". For the why part you can refer to my previous articles or to google for bit by bit details:-)..
Now you get a user controller with several action methods written in it. And the first method written is "Index". In a controller the Index is first method to be called by convention(Defined in routeconfig and you can change that by defining a new route),So we can use it as page load or first page where list is shown..
Let's take a look at all of the methods and try to find some unfamiliar things. I can find two of the things there
1- [HttpPost]-The attribute
2-*FormCollection object as parameter..
What do they mean? Let's get to the first one..
The first part is HttpPost.The "Post" part tickles the mind? Yeah,it's the same Post which was used in webforms behind the scenes. It's not hidden here. And there is also a Get but it is not mentioned. The action methods are by default Get until there are defined as Post by using the attribute[HttpPost].Now the question will be- When to create view with the get and when with post?.
The answer is simple and straight. Whenever you require a read only view,create controller with get and if you require a view with some actions like update or insert etc ,create controller with post.
If you are not getting the above answer, don't worry we'll see that practically..The 2nd part is FormCollection object. Through this object we can refer to the controls in corresponding view.
For Example:-
if we have a control with id Confirm so we can get it's data in the following way.
frmColObj["Confirm"].Where frmColObj is the object of FormCollection class
Now we can cram all of our insertion code in Create controller with HttpPost and the task will be done. But we'll follow some code etiquette and create a repository file for the separation of concerns and re usability..
Let's create another folder named Person Repository. You can create an interface or directly create a class for that. Creating interfaces in considered a good practice but for the sake of simplicity we'll use classes for now..
So in this person repository folder create a class named PersonRepo.cs. There are some common methods in every database centric application like:
Search
Search by ID
Insert
Update
Delete
If we think about it,we find that these five methods are core methods and our custom methods for application requirements are built around them.So we'll create these methods one by one. Start with Insert.
IBaseRepo br = new BaseRepo();
        Dictionary<string, SqlParameter> cmdparams = new Dictionary<string, SqlParameter>();
        public int insertUser(user user)
        {
            cmdparams["mobile"] = new SqlParameter("mobile", user.mobile);
            cmdparams["password"] = new SqlParameter("password", user.password);
            cmdparams["lat"] = new SqlParameter("lat", user.lat);
            cmdparams["longit"] = new SqlParameter("longit", user.longit);
            cmdparams["fname"] = new SqlParameter("fname", user.fname);
            cmdparams["lname"] = new SqlParameter("lname", user.lname);

            cmdparams["uname"] = new SqlParameter("uname", user.uname);
            cmdparams["address"] = new SqlParameter("address", user.address);
            cmdparams["city"] = new SqlParameter("city", user.city);
            cmdparams["state"] = new SqlParameter("state", user.state);
            cmdparams["country"] = new SqlParameter("country", user.country);
            cmdparams["zip"] = new SqlParameter("zip", user.zip);
           int res= br.cudCommand("insertUser", cmdparams);
           return res;
        }
Now we got our insertUser method that can be used for user details insertion. The method cudCommand is defined in base repository. Build the project.
Come back to controller. We can use this method now.To use in create controller we just need to perform following steps:-
1-Create the PersonRepo object.(You can make the PersonRepo object it static or use interface,that's entirely your choice) PersonRepo person = new PersonRepo();
2-Remove that formcollection object as we will not call control values. We'll do the insertion by our user model.
3-Pass the model object in create method as parameter public ActionResult Create(user user)
4-Call the insertUser method of PersonRepo using PersonRepo object and pass parameter.[HttpPost] public ActionResult Create(user user) { try { // TODO: Add insert logic here person.insertUser(user); return RedirectToAction("Index"); } catch { return View(); } }Now create a view by right clicking the "Create" method. Select the template or scaffolding type as "Create" and selecting the model "user" as Model Class. Leave all of the options as they are(for more reference of view creation please refer to previous articles) and click the "Add" button. You get a brand new view with complete user interface for insertion of data. Here you can see that it's easier to generate a UI in MVC if you have any template ready.
Keep the controls as textboxes for now. You may feel like having drop downs for some fields like Country,State and City,but we'll see that in subsequent articles. Following pic gives you the idea of the dialog box that appears for creating a view:-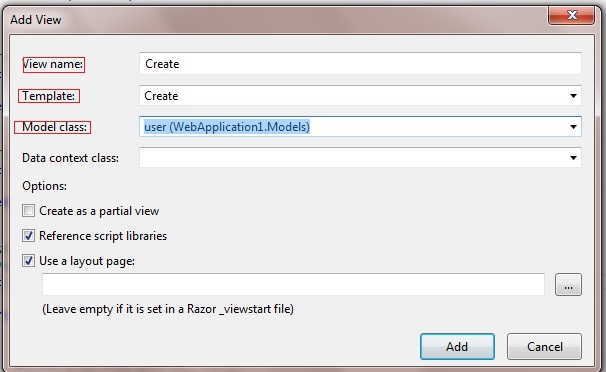
Fig 4-A New View Window We've created the insertUser part ,but we need to see the users created in a list too. So we need a new view but which controller will be used here. The answer is Index. An obvious question again. Why?
There are following reasons for that.
1-Routing sets the Index method of any controller as the first method to be called. Obviously you can change it but I am sure that you know the significance of word "Index" in web development. It is not a rule but more like a convention that the first executable page(in case of HTML or WebForms ) or method(in case of MVC) should be named as "Index".
2-It is the first get method so we can take it like a page load for that view(guys coming from web forms may take view as page and Index controller as it's load method,again refer only)
3-Convention over configuration is the base of MVC so unless we have a solid reason for changing that convention or we know MVC bit by bit(currently not my case though),we shouldn't do it.
Now that we got the method to write our showUsers method,we can use it. But we should add a method in our PersonRepo too.
 public List<user> showUser()
        {
            List<user> lstUser = new List<user>();
            SqlDataReader dr;
            cmdparams.Clear();
           dr= br.readCmd("showUsers", cmdparams);
            while (dr.Read())
            {
                lstUser.Add(new user {
                mobile=dr["mobile"]!=null?   !string.IsNullOrEmpty(Convert.ToString(dr["mobile"]))?
                Convert.ToString(dr["mobile"]).Trim():null:null,
                password = dr["password"] != null ? !string.IsNullOrEmpty(Convert.ToString(dr["password"])) ?
               Convert.ToString(dr["password"]).Trim() : null : null,
                lat = dr["lat"] != null ? !string.IsNullOrEmpty(Convert.ToString(dr["lat"])) ?
               Convert.ToString(dr["lat"]).Trim() : null : null,
                longit = dr["long"] != null ? !string.IsNullOrEmpty(Convert.ToString(dr["long"])) ?
               Convert.ToString(dr["long"]).Trim() : null : null,
                fname = dr["f_name"] != null ? !string.IsNullOrEmpty(Convert.ToString(dr["f_name"])) ?
              Convert.ToString(dr["f_name"]).Trim() : null : null,
                lname = dr["l_name"] != null ? !string.IsNullOrEmpty(Convert.ToString(dr["l_name"])) ?
              Convert.ToString(dr["l_name"]).Trim() : null : null,
                uname = dr["u_name"] != null ? !string.IsNullOrEmpty(Convert.ToString(dr["u_name"])) ?
              Convert.ToString(dr["u_name"]).Trim() : null : null,
                address = dr["Address"] != null ? !string.IsNullOrEmpty(Convert.ToString(dr["Address"])) ?
              Convert.ToString(dr["Address"]).Trim() : null : null,
                city = dr["city"] != null ? !string.IsNullOrEmpty(Convert.ToString(dr["city"])) ?
              Convert.ToString(dr["city"]).Trim() : null : null,
                state = dr["state"] != null ? !string.IsNullOrEmpty(Convert.ToString(dr["state"])) ?
              Convert.ToString(dr["state"]).Trim() : null : null,
                country = dr["country"] != null ? !string.IsNullOrEmpty(Convert.ToString(dr["country"])) ?
              Convert.ToString(dr["country"]).Trim() : null : null,
                zip = dr["zip"] != null ? !string.IsNullOrEmpty(Convert.ToString(dr["zip"])) ?
              Convert.ToString(dr["zip"]).Trim() : null : null,
                });
            }
            return lstUser;
        }
Looks scary? Nothing to get scared about. It's just a method which returns a list of users. In the add method we use a ternary operator to ensure that only fields having some values are converted into string. If we try to convert nulls or space we will get an exception. So this is a one liner for each entity otherwise you'd have to write long syntaxes of if-else or switch. Now build the solution and our method is ready. We'll use it like following.:-
 public ActionResult Index()
        {
            var userList = person.showUser();
            return View(userList);
        }
Now we have a method for showing the list,but we require a list too.So we need to add a view with a list. What? Don't find a list in toollbox. Don't worry,MVC will do it for us. How?
Just create the view the way you did previously in Create method. Now select "List " in template and for model class select "user" model.
Now click Add and you'll find a view added with a list. This list iterates the model collection according to the template and produces the list with edit,details and delete buttons.A lot of work we did there,didn't we? Now it's time for running the project and viewing the result. What are you waiting for,run it.
Wait,we got that same default page again,where is our user page?
We've that user page but we're not routed there yet because the default route points to "Index" method of "Home" controller. So we need to change the controller so that it points to the "Index" method of our "user" controller.
Go to RouteConfig.cs and change the controller name from "Home" to "user".
Now run the project again. And we see the following page in browser.:-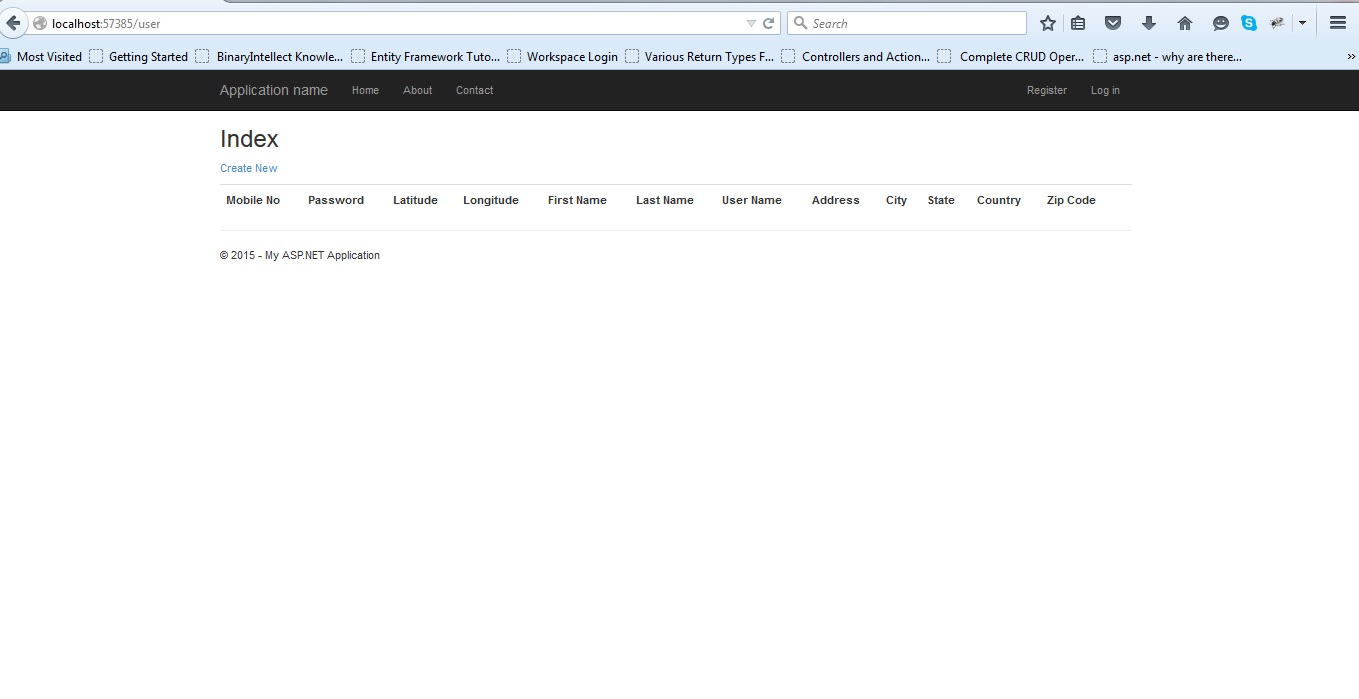
Fig 5-The Empty List List is there with headings but no data in it. So we need to insert some users. But you need to notice something. Remember those "Annotations" in your model. Had you not implemented those annotations,the headings would be like mobile,password,lat,longit,fname and so on ,which you can't say good for UI point of view. Same stands true for the create section we're going to see.
Now click the "Create New" link. You will be redirected to the screen as following:-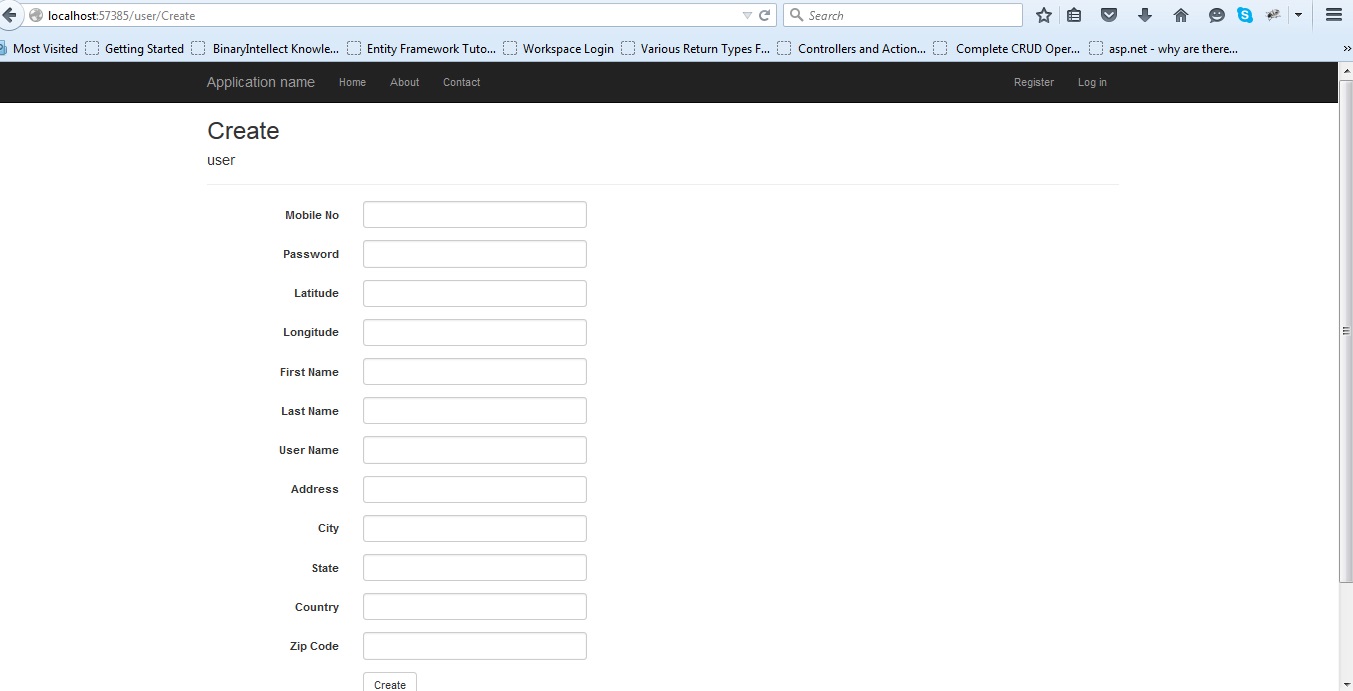
Fig 6-The Create View You get a long list of textboxes to be filled. They are autogenerated according to the model structure.
Let's check our validations we placed in the model. According to that the mobile no and password are required fields. So,click the create button. And you'll see that form is not posted and two messages are shown.
1-The Mobile No field is required.
2-The Password field is required.
Our validations are working. Our Display Name is working. Now start filling your data.
One more thing to see here. We can see our password. Generally it should be in the format of any masked character(dots by default).So what's missing?
We need another annotaion on password so that the it can be recognized as password field. So add the following annotation over "password" property in model.[DataType(DataType.Password)]
Now build and run the project again and go to create page. No we can see the password field as it should be(masked).
Fill the data and press the create button. You can see your details in the list as soon as you create the user.
The pic for the creration and list are given below.
Create:-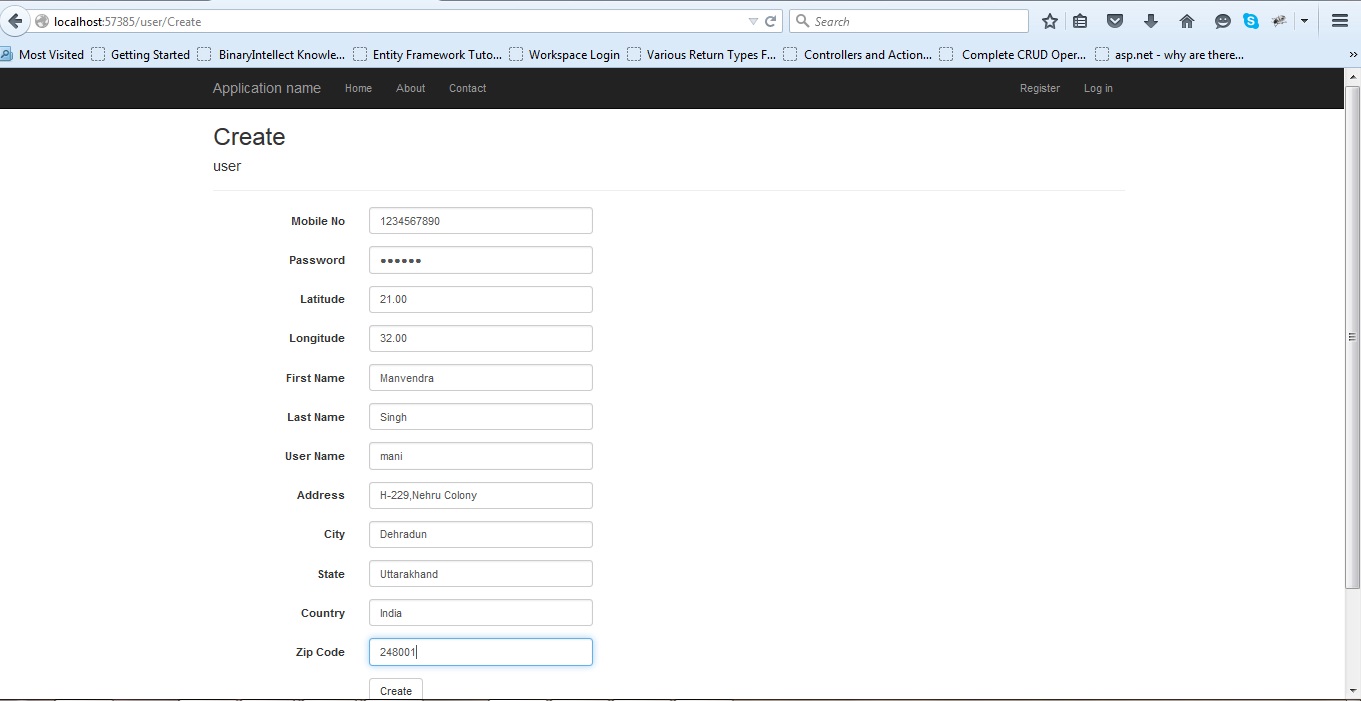
Fig 7-The Create View(Data Inserted) List:-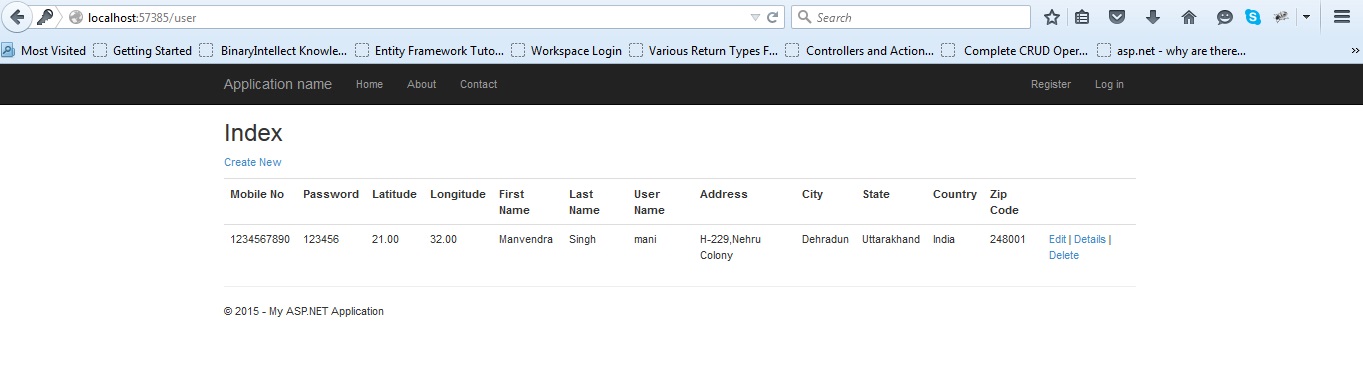
Fig 8-The List(Filled with Data) So we've completed the basic CRUD for MVC. It is basic because it has approxiamtely no validations or proper UI(drop downs should be there for coutry etc) and violates many coding conventions but it does tells us about how to do the insertion and show the data in the list. We'll improve the application with more validations.
Apart from that some buttons like "Edit,Details and Delete" don't work and provide error. Why?
You can get the answer in next article. If you are eager to find out,think about it. It's simpler than you think. For hint-correlate user controller methods and views for those methods.Happy Coding!:-)


-
about 11 years ago
nice blog :)
-


1 Comment(s)