Lets suppose , we need an application which able to upload a file(i.e. pdf, doc, htm, html, docx) and user can delete it form the list in rails. So here we will use 'carrierwave' to upload file and for styling the pages use 'bootstrap-sass' gem. To develop this app in rails, there are the some steps given as below...
Download App
Step1: Create new application
Step2: Add gem in Gemfile
Step3: Bundle install
Step4: Change db configuration if required
Step5: Create a model for upload a doc
Step6: Create a controller with actions like new, create, destroy
Step7: Create an uploader using carrierwave gem
Step8: Call uploader in model
Step9: Modify route regarding to root and resources
Step10: Add bootstrap to style our web pages
Step11: Modify the views pages like index, new to deploy style of bootstrap
Now we are explaining all the steps one by one
Step1: Create new application
Run command to create new app
rails new my_profile
and go to my_profile app by run below command
cd my_profile
Step2: Add gem in Gemfile
Path: my_profile/Gemfile
gem 'carrierwave', '~> 0.9'
gem 'bootstrap-sass', '~> 2.3.2'
#gem 'sqlite3'
gem 'mysql2' #here we are using mysql so we added mysql gem
Step3: Install bundle
Run command to bundle install
bundle install
Step4: Change db configuration if required
As we know that we are using mysql database in this app, so there is need to change in database.yml
Path: my_profile/config/database.yml
default: &default
  adapter: mysql2
  username: root #your mysql username
  password: root #your mysql password
  pool: 5
  timeout: 5000

development:
  <<: *default
  database: dev_profile

# Warning: The database defined as "test" will be erased and
# re-generated from your development database when you run "rake".
# Do not set this db to the same as development or production.
test:
  <<: *default
  database: test_profile

production:
  <<: *default
  database: prod_profile
And run below command to create database
rake db:create
Step5: Create a model for upload a doc
Here we'll create a model named as Doc to upload a doc file and to cerate Doc model run bellow command
rails g model Doc title:string attachment:string
Here title: is a column_name in db table docs to store the doc title and attachment: is an other column_name in db table docs to store the uploaded file name
now run below migration command to create table in db
rake db:migrate
Step6: Create a controller with actions like new, create, destroy
In our application, we need only upload/creation of new doc, listing and delete action for uploaded doc. So we'll create a controller with actions index, new, create and destroy and also create its views
To create controller use the below command
rails g controller Docs index new create destroy
Lets modifying controller according to our requirement
class DocsController < ApplicationController
  def index
    @docs = Doc.all
  end

  def new
    @doc = Doc.new
  end

  def create
    @doc = Doc.new(resume_params)

    if @doc.save
      redirect_to docs_path, notice: "The doc #{@doc.title} has been uploaded."
    else
      render "new"
    end
  end

  def destroy
    @doc = Doc.find(params[:id])
    @doc.destroy
    redirect_to docs_path, notice:  "The docs #{@doc.title} has been deleted."
  end

private
  def resume_params
    params.require(:doc).permit(:title, :attachment)
  end

end
Finally, we have created a model-views-controller for the Doc and now we'll implement the 'carrierwave' gem to upload the doc file into application.
Step7: Create an uploader using carrierwave gem
To create an uploader using 'carrierwave' gem run below command
rails g uploader attachment
Here attachment is table column name in above command and also will create a file attachment_uploader.rb file in app/uploader that is my_profile/app/uploaders/attachment_uploader.rb
Now we need to change according to our requirement and modified file looks like...
Path: my_profile/app/uploaders/attachment_uploader.rb
class AttachmentUploader < CarrierWave::Uploader::Base
storage :file

  def store_dir
    "uploads/#{model.class.to_s.underscore}/#{mounted_as}/#{model.id}"
  end

  def extension_white_list
    %w(pdf doc htm html docx xlsx)
  end
end
In this file we can white list extension of the document. For example we can restrict a pdf file to upload. For this remove the pdf from extension_white_list method, i.e
def extension_white_list
    %w(doc htm html docx xlsx)
  end
Step8: Call uploader in model
To call the 'carrierwave' gem uploader, modify the mode doc.rb as below..
Path: my_profile/app/models/doc.rb
class Doc < ActiveRecord::Base
  mount_uploader :attachment, AttachmentUploader
  validates :title, presence: true
end
This line "mount_uploader :attachment, AttachmentUploader" tells to rails to use the carrierwave gem uploader for doc.rb model
Step9: Modify route regarding to root and resources like below..
Rails.application.routes.draw do
  resources :docs, only: [:index, :new, :create, :destroy]
  root "docs#index"
end
Step10: Add bootstrap to style our web pages
To add bootstrap styling in app add below line of code into docs.scss
Path: my_profile/app/assets/stylesheets/docs.scss
@import "bootstrap";
Step11: Modify the views pages like index, new to deploy style of bootstrap and functionality
The modified code of the files given below...
Path: my_profile/app/views/layouts/application.html.erb
<!DOCTYPE html>
<html>
<head>
  <title>MyProfile</title>
  <%= stylesheet_link_tag    'application', media: 'all', 'data-turbolinks-track' => true %>
  <%= javascript_include_tag 'application', 'data-turbolinks-track' => true %>
  <%= csrf_meta_tags %>
</head>
<body>
<div class="container" style="padding-top:20px;">
<%= yield %>
</div>
</body>
</html>
Path: my_profile/app/views/docs/index.html.erb
<% if !flash[:notice].blank? %>
  <div class="alert alert-info">
  <%= flash[:notice] %>
  </div>
<% end %>
<br />
<%= link_to "New Doccument", new_doc_path, class: "btn btn-primary" %>
<br />
<br />
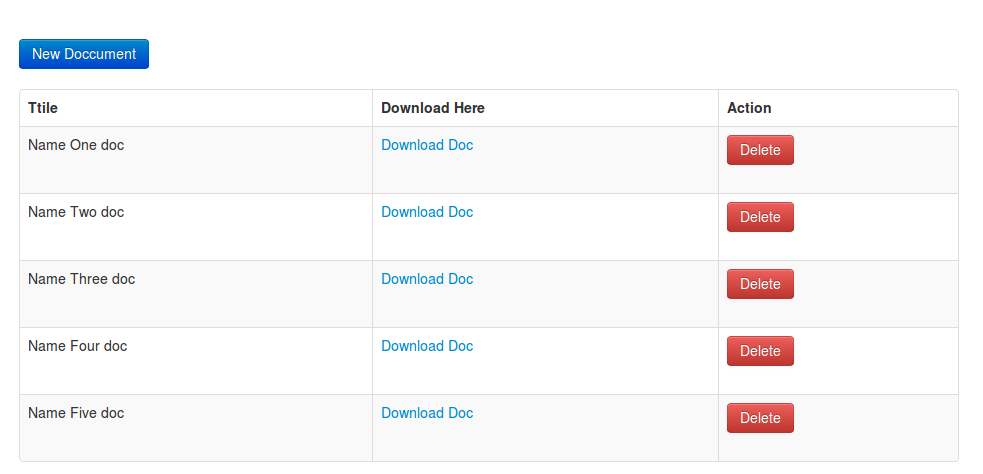
<table class="table table-bordered table-striped">
  <thead>
    <tr>
      <th>Ttile</th>
      <th>Download Here</th>
      <th>Action</th>
    </tr>
  </thead>
  <tbody>
    <% @docs.each do |doc| %>
      <tr>
        <td><%= doc.title %></td>
        <td><%= link_to "Download Doc", doc.attachment_url %></td>
        <td><%= button_to "Delete",  doc, method: :delete, class: "btn btn-danger", data: { confirm: "Are you sure that you wish to delete #{doc.title}?" } %></td>
      </tr>
    <% end %>
  </tbody>
</table>
Finally, run application by 'rails s' command and we are able to add new document, delete one and view the document list. Some screen-shots given below...


You can also download app on click here
0 Comment(s)