-
How to Implement Custom Camera Functionality using Swift3 iOS App
almost 9 years ago
To Implement camera functionality in iOS, we use Image Picker Controller but if we need to change the style and functionality other than of Image Picker Controller then we need to create a custom camera. So, in this tutorial, we will see an example to create a custom camera using Swift 3 in iOS.
Lets see how:
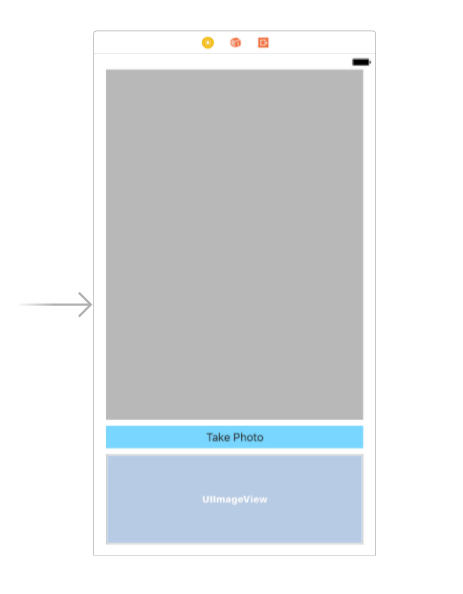
First of all, we will create user interface according to our need or requirement and include 3 elements in a controller:-- UIView
- ImageView
- UIButton
UIView is used to show the camera to the user, UIImageView is used to show the clicked image as a preview and last but not the least UIButton is used to take a picture and show in UIImageView. Screenshot of user interface of the screen is given below:-
Now we will move towards the coding part of the custom camera functionality. Create outlet of two elements UIView as previewView which is used to show the camera and another one is ImageView as capturedImage to show the preview of what camera is captured. UIButton is used for button action so we will not create the outlet of UIButton we will create action of UIButton named btnTakePhoto.
Now import AVFoundation framework and create instance variables above viewDidLoad method. These are global variables so we can use them anywhere in the view controller file.
    var session: AVCaptureSession?
    var stillImageOutput: AVCaptureStillImageOutput?
    var videoPreviewLayer: AVCaptureVideoPreviewLayer?
Now in the viewWillAppear method, we will setup the camera and all code of custom camera come inside this method. For capturing the image we need to create an action of UIButton named btnTakePhoto and inside this method, first of all, we need to create a connection after getting connection code to capture image will come, how image data get processed and add an image in imageview will come along.
//
//  ViewController.swift
//  CustomCameraInSwift
//
//  Created by elcaptain1 on 9/11/17.
//  Copyright  2017 Tanuja. All rights reserved.
//

import UIKit
import AVFoundation

class ViewController: UIViewController {

    @IBOutlet weak var previewView: UIView!

    @IBOutlet weak var capturedImage: UIImageView!

    var session: AVCaptureSession?
    var stillImageOutput: AVCaptureStillImageOutput?
    var videoPreviewLayer: AVCaptureVideoPreviewLayer?

    override func viewDidLoad() {
        super.viewDidLoad()
        // Do any additional setup after loading the view, typically from a nib.
    }

    override func didReceiveMemoryWarning() {
        super.didReceiveMemoryWarning()
        // Dispose of any resources that can be recreated.
    }

    override func viewWillAppear(_ animated: Bool) {
        super.viewWillAppear(animated)
        session = AVCaptureSession()
        session!.sessionPreset = AVCaptureSessionPresetPhoto
        let backCamera = AVCaptureDevice.defaultDevice(withMediaType: AVMediaTypeVideo)
        var error: NSError?
        var input: AVCaptureDeviceInput!
        do {
            input = try AVCaptureDeviceInput(device: backCamera)
        } catch let error1 as NSError {
            error = error1
            input = nil
            print(error!.localizedDescription)
        }
        if error == nil && session!.canAddInput(input) {
            session!.addInput(input)
            stillImageOutput = AVCaptureStillImageOutput()
            stillImageOutput?.outputSettings = [AVVideoCodecKey: AVVideoCodecJPEG]
            if session!.canAddOutput(stillImageOutput) {
                session!.addOutput(stillImageOutput)
                videoPreviewLayer = AVCaptureVideoPreviewLayer(session: session)
                videoPreviewLayer!.videoGravity = AVLayerVideoGravityResizeAspect
                videoPreviewLayer!.connection?.videoOrientation = AVCaptureVideoOrientation.portrait
                previewView.layer.addSublayer(videoPreviewLayer!)
                session!.startRunning()

            }

        }
    }


    override func viewDidAppear(_ animated: Bool) {
        super.viewDidAppear(animated)
        videoPreviewLayer!.frame = previewView.bounds
    }

    @IBAction func btnTakePhoto(_ sender: AnyObject) {
        let videoConnection = stillImageOutput!.connection(withMediaType: AVMediaTypeVideo)
        if(videoConnection != nil) {
            stillImageOutput?.captureStillImageAsynchronously(from: videoConnection, completionHandler: { (sampleBuffer, error) -> Void in
                if sampleBuffer != nil {
                    let imageData = AVCaptureStillImageOutput.jpegStillImageNSDataRepresentation(sampleBuffer)
                    let dataProvider = CGDataProvider(data: imageData as! CFData)
                    let cgImageRef = CGImage.init(jpegDataProviderSource: dataProvider!, decode: nil, shouldInterpolate: true, intent: CGColorRenderingIntent.relativeColorimetric)

                    let image = UIImage(cgImage: cgImageRef!, scale: 1.0, orientation: UIImageOrientation.right)
                    self.capturedImage.image = image
                }
            })
        }
    }

}
Write the following two lines in info.plist file to allow camera access by the application.
    <key>NSCameraUsageDescription</key>
    <string>Allow Camera Usage</string>
After implementing the above code you can easily test the application in the device as simulator does not support camera functionality to test the application in the device.You can also download the sample code from the file attached below, if you have any questions please feel free to write in comments below.


0 Comment(s)