-
How to Play, Record & Save Videos in Swift3 iOS App in iPhone
almost 8 years ago
If you have ever tried to play, record and save a video using iOS Swift 3 language and found difficulty or messy code, then today in this tutorial, I am here with a simple and easy example for you. Lets's discuss all the aspects one by one.
We will start with the user interface of the application i.e storyboard.
We need two controllers here one will include two buttons:-
- Play Video button
- Record Video button
Play Video button is used to pick a video from gallery i.e already saved videos and play the selected video.
Record Video button will redirect the user to the next controller where the user will get an another button named start video and on clicking that button user can record the video and video will get saved in the gallery which can play by going back to the previous screen and press play video button.
Screenshot of storyboard is given below:-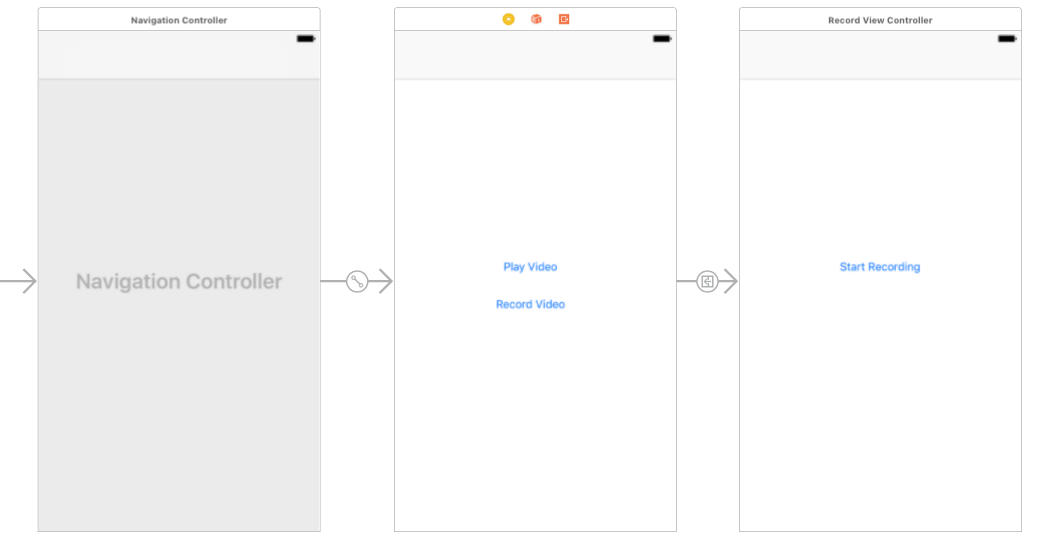
Now we will move towards the coding part. First of all, we will start with ViewController file and include given two lines:-import MediaPlayer import MobileCoreServicesNow we are ready to use classes present inside these two frameworks. Create extension of class and include UIImagePickerControllerDelegate, UINavigationControllerDelegate as given below:-
// MARK: - UIImagePickerControllerDelegate
extension ViewController: UIImagePickerControllerDelegate {

}

// MARK: - UINavigationControllerDelegate
extension ViewController: UINavigationControllerDelegate {
}
Also, create action of play video button and we do not need to create action of the second button as we have already provided the segue to the next controller from the button. so instead of creating action of the button, we need to create a direct segue from the storyboard which will redirect the user to the next view controller. Below is the code of the ViewController file:-
ViewController

//
//  ViewController.swift
//  PlayVideoApplication
//
//  Created by elcaptain1 on 9/13/17.
//  Copyright  2017 Tanuja. All rights reserved.
//

import UIKit
import MediaPlayer
import MobileCoreServices

class ViewController: UIViewController {

    override func viewDidLoad() {
        super.viewDidLoad()
        // Do any additional setup after loading the view, typically from a nib.
    }

    override func didReceiveMemoryWarning() {
        super.didReceiveMemoryWarning()
        // Dispose of any resources that can be recreated.
    }
    func startMediaBrowserFromViewController(viewController: UIViewController, usingDelegate delegate: UINavigationControllerDelegate & UIImagePickerControllerDelegate) -> Bool {
        // 1
        if UIImagePickerController.isSourceTypeAvailable(.savedPhotosAlbum) == false {
            return false
        }

        // 2
        let mediaUI = UIImagePickerController()
        mediaUI.sourceType = .savedPhotosAlbum
        mediaUI.mediaTypes = [kUTTypeMovie as NSString as String]
        mediaUI.allowsEditing = true
        mediaUI.delegate = delegate

        // 3
        present(mediaUI, animated: true, completion: nil)
        return true
    }

    @IBAction func btnPlayVideo(_ sender: AnyObject) {
        _ = startMediaBrowserFromViewController(viewController: self, usingDelegate: self)
    }
}

// MARK: - UIImagePickerControllerDelegate
extension ViewController: UIImagePickerControllerDelegate {
    private func imagePickerController(picker: UIImagePickerController, didFinishPickingMediaWithInfo info: [String : AnyObject]) {
        // 1
        let mediaType = info[UIImagePickerControllerMediaType] as! NSString

        // 2
        dismiss(animated: true) {
            // 3
            if mediaType == kUTTypeMovie {
                let moviePlayer = MPMoviePlayerViewController(contentURL: info[UIImagePickerControllerMediaURL] as! URL!)
                self.presentMoviePlayerViewControllerAnimated(moviePlayer)
            }
        }
    }
}

// MARK: - UINavigationControllerDelegate
extension ViewController: UINavigationControllerDelegate {
}
Here is the next view controller where the record button will take to the user which is RecordViewController.
//
//  RecordViewController.swift
//  PlayVideoApplication
//
//  Created by elcaptain1 on 9/13/17.
//  Copyright  2017 Tanuja. All rights reserved.
//

import UIKit
import MediaPlayer
import MobileCoreServices

class RecordViewController: UIViewController {

    override func viewDidLoad() {
        super.viewDidLoad()

        // Do any additional setup after loading the view.
    }

    override func didReceiveMemoryWarning() {
        super.didReceiveMemoryWarning()
        // Dispose of any resources that can be recreated.
    }

    func startCameraFromViewController(viewController: UIViewController, withDelegate delegate: UIImagePickerControllerDelegate & UINavigationControllerDelegate) -> Bool {
        if UIImagePickerController.isSourceTypeAvailable(.camera) == false {
            return false
        }

        let cameraController = UIImagePickerController()
        cameraController.sourceType = .camera
        cameraController.mediaTypes = [kUTTypeMovie as NSString as String]
        cameraController.allowsEditing = false
        cameraController.delegate = delegate

        present(cameraController, animated: true, completion: nil)
        return true
    }
    func video(videoPath: NSString, didFinishSavingWithError error: NSError?, contextInfo info: AnyObject) {
        var title = "Success"
        var message = "Video is saved in gallery"
        if let _ = error {
            title = "Error"
            message = "Video failed to save in gallery"
        }
        let alert = UIAlertController(title: title, message: message, preferredStyle: .alert)
        alert.addAction(UIAlertAction(title: "OK", style: UIAlertActionStyle.cancel, handler: nil))
        present(alert, animated: true, completion: nil)
    }

    @IBAction func btnStartRecording(_ sender: AnyObject) {
     startCameraFromViewController(viewController: self, withDelegate: self)
    }

}

extension RecordViewController: UIImagePickerControllerDelegate {
    func imagePickerController(_ picker: UIImagePickerController, didFinishPickingMediaWithInfo info: [String : Any]) {
                let mediaType = info[UIImagePickerControllerMediaType] as! NSString
                dismiss(animated: true, completion: nil)
                // Handle a movie capture
                if mediaType == kUTTypeMovie {
                    guard let path = (info[UIImagePickerControllerMediaURL] as! NSURL).path else { return }
                    if UIVideoAtPathIsCompatibleWithSavedPhotosAlbum(path) {
                        UISaveVideoAtPathToSavedPhotosAlbum(path, self, #selector(RecordViewController.video(videoPath:didFinishSavingWithError:contextInfo:)), nil)
                    }
                }
    }

}

extension RecordViewController: UINavigationControllerDelegate {
}
When you will build the application an error will come because permission is not given to the application to access the camera and gallery in the device, so we need to provide permission by including below lines in info.plist file.<key>NSPhotoLibraryUsageDescription</key> <string>This app requires access to the photo library.</string> <key>NSMicrophoneUsageDescription</key> <string>This app does not require access to the microphone.</string> <key>NSCameraUsageDescription</key> <string>This app requires access to the camera.</string>Test the application in the device as this code includes camera functionality so you need to run this application in the device. You can also download the attached sample code below.
If you have any questions, please feel free to ask in comments.


0 Comment(s)