-
Guide to Wordpress Menus
about 9 years ago
Hello reader's !
In this tutorial we discuss about How to add menu in WordPress.So if you want to add menu in your WordPress Site follow the steps one by one.
- Login to the WordPress Dashboard.
- From the 'Appearance' menu on the left-hand side of the Dashboard, select the 'Menus' option to bring up the Menu Editor.
- Select Create a new menu at the top of the page
- Enter a name for your new menu in the Menu Name box
- Click the Create Menu button.
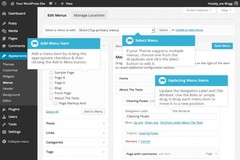
Adding Items to a Menu :-
You can add different link types into your menu, these are split between single window left of the menu you're currently editing.
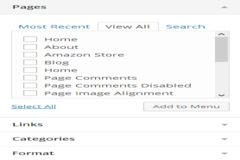
- Locate the single window entitled Pages.
- Within this single window, select the View All link to bring up a list of all the currently published Pages on your site.
- Select the Pages that you want to add by clicking the checkbox next to each Page's title.
- Click the Add to Menu button located at the bottom of this single window to add your selection(s) to the menu that you created in the previous step.
- Click the Save Menu button once you've added all the menu items you want.
Your custom menu has now been saved.
Creating Multi-level Menus
When planning the structure of your menu, it helps to think of each menu item as a heading in a formal report document. In a formal report, main section headings (Level 1 headings) are the nearest to the left of the page; sub-section headings (Level 2 headings) are indented slightly further to the right; any other subordinate headings (Level 3, 4, etc) within the same section are indented even further to the right.
By using simple drag and drop interface you can create multi-level menus, as WordPress menu editor allows this feature. You can Drag menu items up or down to change their order of appearance in the menu also can if you want to create sub-level within your menu drag menu items left or right.
To make one menu item a subordinate of another, you need to position the 'child' underneath its 'parent' and then drag it slightly to the right.
- Position the mouse over the 'child' menu item.
- Whilst holding the left mouse button, drag it to the right.
- Release the mouse button.
- Repeat these steps for each sub-menu item.
- Click the Save Menu button in the Menu Editor to save your changes.
Add the below code into your function.php to register your menu
<?php
    /* Add Menu support and add positions */
    if (function_exists('add_theme_support'))
    {
        add_theme_support('menus');
    }

    add_action( 'init', 'register_my_menus' );

    function register_my_menus()
    {
        register_nav_menus(
        array(
            'primary'   => __( 'Primary Navigation', 'theme name' ),
            'secondary' => __( 'Secondary Navigation', 'theme name' )
        ) );
    }
?>
In case, you need to call different menu in different page then you can create different menu(primary, secondary, trinary, etc) just add the same code into your function.php file.
Call menu in header.php :-
<?php wp_nav_menu( array( 'container_class' => 'menu-header', 'theme_location' => 'primary' ) ); ?>
or,
<?php wp_nav_menu( array( 'container_class' => 'menu-header', 'theme_location' => 'secondary' ) ); ?>


0 Comment(s)